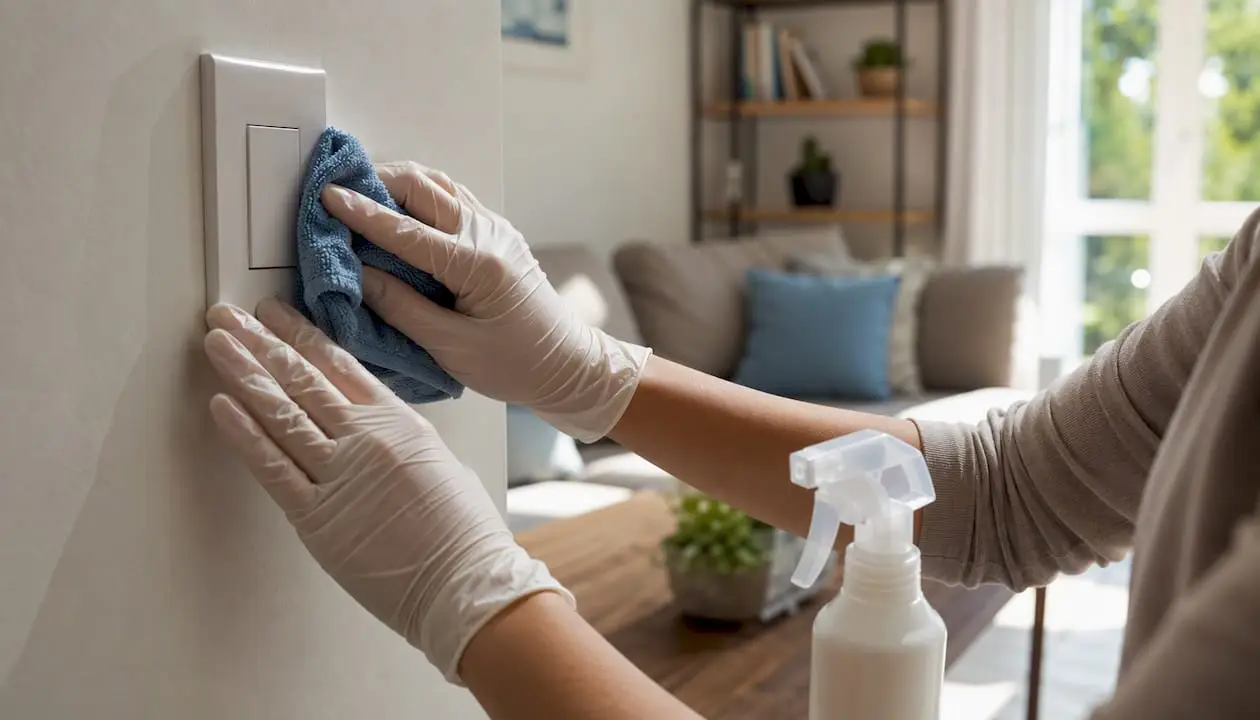
High touch surface cleaning means finding the objects everyone in your space grabs, presses, or holds all day, washing them with soap and water, then disinfecting them with an EPA-registered product or a bleach or alcohol solution mixed to the right strength. If you only remember one sequence today, remember this: clean first, disinfect second, then let the disinfectant sit for its full contact time before you wipe it away.
Here’s the fast version, if you need to act right now:
- Wipe away visible dirt, dust, or grime with soap or detergent and water.
- Apply an EPA-registered disinfectant, a diluted bleach solution, or 70%+ alcohol.
- Keep the surface visibly wet for the full contact time listed on the label, not just a quick pass.
- Let it air dry. Don’t wipe it dry early.
Pro Tip: Most people fail at this step, not the cleaning: they wipe the disinfectant off after ten seconds because that’s how long a paper towel wipe usually takes. Read the label. Some products need a full four minutes of visible wetness to actually kill what you’re targeting.
One more thing before you grab a rag: ventilate the room and never mix bleach with ammonia or other cleaning products. Wear gloves if the label tells you to. Mixing chemicals to “boost” disinfecting power is the single most common way people accidentally poison their own bathroom.
Key Takeaways
Effective high-touch surface cleaning requires cleaning with soap and water first, disinfecting second, and honoring the full contact time printed on the product label.
| Point | Details |
|---|---|
| Follow the sequence | Clean with soap and water before disinfecting; skipping this lets soil block the disinfectant. |
| Respect contact time | Keep the surface visibly wet for the full time on the label, not just a quick wipe. |
| Increase frequency when needed | Go daily to twice-daily during illness, flu season, or high foot traffic. |
| Match the surface to the method | Use alcohol wipes on electronics and laundering on fabrics, not bleach on either. |
| Know when to call in help | Purehomescleaning offers eco-friendly routine and deep cleaning with a targeted high-touch surface option for homes across the DC, Virginia, and Maryland area. |
Where to Verify This Guidance Yourself
- The CDC’s guidance on when and how to clean and disinfect your home covers the core sequence and post-illness recommendations in detail.
- The WHO’s Q&A on cleaning and disinfecting non-healthcare surfaces includes the bleach dilution recipe and alcohol concentration guidance referenced throughout this article.
- The EPA’s list of selected registered disinfectants lets you confirm a product’s registration before you buy it.
Always check the specific product label in front of you before use; concentrations, contact times, and surface compatibility vary by manufacturer, and workplaces may have their own additional requirements beyond general household guidance.
This article is general information, not a substitute for advice from a qualified doctor. Consult a qualified healthcare professional about your own circumstances before acting on anything here.
Table of Contents
- What Counts as a High-Touch Surface, and Why It Matters
- Where High-Touch Surfaces Actually Hide
- The Clean-Then-Disinfect Protocol, Step by Step
- Which Products Actually Work, and How to Mix Them Safely
- Cleaning Electronics, Fabrics, and Delicate Finishes Without Ruining Them
- How Often Should You Actually Be Cleaning These Surfaces?
- Keeping Yourself Safe While You Disinfect
- Do UV Lights and Fogging Machines Actually Help?
- Your One-Page High-Touch Cleaning Checklist
- What to Expect From a Professional High-Touch Cleaning Service
- Sources
What Counts as a High-Touch Surface, and Why It Matters
A high-touch surface is anything handled by multiple people, repeatedly, over the course of a day. Doorknobs. Light switches. Faucet handles. Countertops. Toilet handles. Remotes. Phones. Keyboards. Drawer pulls. The CDC defines these as hotspots for pathogen accumulation precisely because they get touched so often that whatever lands on them doesn’t have time to die off before the next hand arrives.
Cleaning and disinfecting are not the same task, and mixing them up is where most household hygiene routines quietly fail. Cleaning removes dirt, dust, and organic material with soap or detergent and water. Disinfecting kills or inactivates germs left behind, and it only works reliably once the surface is already clean. Skip the cleaning step and a disinfectant has to fight through grease and grime to reach anything worth killing.
Frequently touched objects act as a relay system for pathogens. A doorknob touched by ten people in an hour can transfer whatever the first person left behind to the ninth person, long after that first contact happened.
Understanding transmission risk changes how you prioritize. Respiratory viruses like influenza and the virus that causes COVID-19 spread mainly through the air, but contaminated surfaces still contribute to the chain, especially in shared bathrooms, kitchens, and common areas. Bacterial pathogens, including staph and strains of E. coli, survive on hard surfaces for hours or days. Categorize what you’re dealing with into three buckets: hand-operated fixtures (knobs, switches, handles), shared devices (phones, keyboards, remotes, tablets), and food-prep zones (counters, cutting boards, refrigerator handles). Every room in your home or facility has some mix of all three.
Where High-Touch Surfaces Actually Hide
You know about doorknobs. You probably don’t think about your phone case as often as you should. Here’s a room-by-room and setting-by-setting rundown that catches the surfaces people routinely skip.
In the home:
- Kitchen: refrigerator handle, microwave door and buttons, faucet handle, cabinet pulls, coffee maker buttons.
- Bathroom: toilet flush handle, faucet handle, light switch, towel bars.
- Living room: remote controls, light switches, gaming controllers, table edges near seating.
- Electronics: phone screens and cases, tablets, laptop keyboards and trackpads, charger cords.
In the office:
- Keyboards, mice, and shared monitors.
- Printer and copier touchscreens or buttons.
- Door handles, elevator call buttons, and breakroom appliance handles.
- Shared conference room tables and whiteboard markers.
In public spaces:
- Handrails on stairs and escalators.
- Elevator buttons and turnstiles.
- ATM keypads and self-checkout screens.
- Shopping cart handles.
Overlap with healthcare-adjacent settings:
- Bedside tables, call buttons, and IV poles in home-care or assisted-living situations.
- Medical equipment handles and shared thermometers.
A few surfaces surprise people because they don’t look like “high touch” objects. Phone cases pick up whatever your hands touched all day and then sit against your face. Bag straps and gym bag handles rarely get cleaned at all. Appliance buttons, especially on microwaves and coffee makers, get touched with unwashed hands multiple times a day. When someone in the house is sick, or you’re hosting frequent visitors, bump those overlooked items to the top of your list, not the bottom.
The Clean-Then-Disinfect Protocol, Step by Step
The protocol is short: clean with soap or detergent and water to remove visible soil, then disinfect and let the product sit for its full labeled contact time. Everything else is execution detail, but the execution detail is where most people lose the benefit of doing this at all.
1. Gather your supplies before you start. Microfiber cloths, soap or an all-purpose cleaner, an EPA-registered disinfectant or your prepared bleach or alcohol solution, gloves if the label calls for them, and a trash bag for disposable wipes.
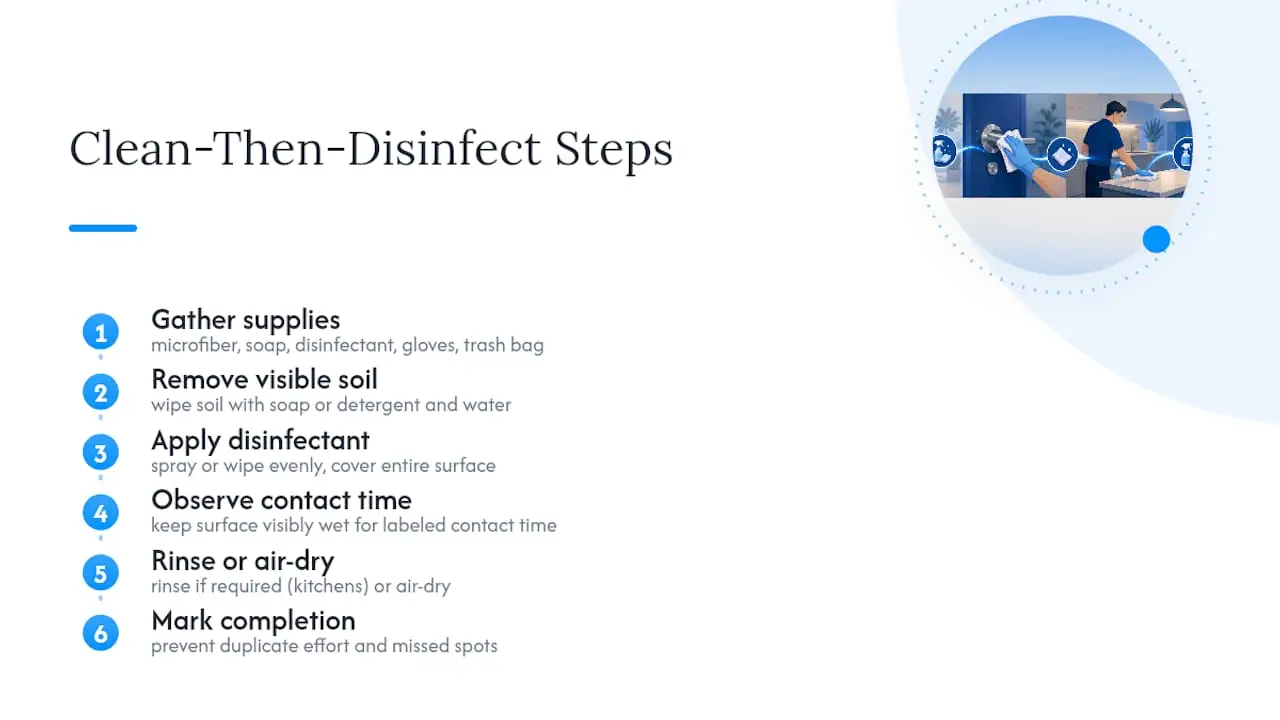
2. Remove visible soil first. Wipe down grease, dust, food residue, or grime with soap and water. This step alone does a lot of the heavy lifting because organic matter blocks disinfectants from reaching pathogens.
3. Apply the disinfectant. Spray or wipe it on evenly, covering the entire surface, not just the center.
4. Observe the contact time. This is the step almost everyone rushes. The surface needs to stay visibly wet for the exact time printed on the label, which can range from thirty seconds to ten minutes depending on the product and the pathogen it’s targeting.
5. Rinse or air-dry as directed. Some products, especially in kitchens, need a water rinse afterward. Others are fine to air-dry.
6. Mark it done if you’re managing multiple rooms or a facility. A simple checklist or sign-off sheet prevents duplicate effort and missed spots.
Pro Tip: Wipe in an S-pattern instead of circles. Circular wiping tends to push soil around and miss edges; an S-pattern gives you full, overlapping coverage in one continuous motion. For high-traffic facilities, a two-cloth system, one for cleaning and a separate one for disinfecting, keeps you from re-contaminating a surface you just treated.
The most common mistake isn’t skipping a step. It’s rushing the contact time. One of the biggest reasons disinfection fails in practice is wiping or rinsing a surface before the product has had time to work. A close second: assuming a spray bottle labeled “disinfectant” works the same way as a wipe labeled the same. Concentrations and contact times vary by product, not by category.
And never mix bleach with ammonia, vinegar, or other household cleaners. The combination produces toxic gas, and it happens more often than you’d think when people try to “double up” for a tougher clean.
Which Products Actually Work, and How to Mix Them Safely
Not every spray bottle under your sink qualifies as a disinfectant, even if the label says “kills germs.” The EPA maintains List N, a registry of disinfectant products verified to meet specific efficacy criteria against particular pathogens, including the virus that causes COVID-19. Checking a product against that list, or confirming it carries an EPA registration number on the label, is the single easiest way to know you’re buying something that actually does what it claims.
If you’d rather mix your own, the WHO recipe for a bleach solution calls for roughly 0.1% sodium hypochlorite, about 1,000 ppm. In practical kitchen terms, that’s 5 tablespoons (a third of a cup) of regular 5% household bleach per gallon of room-temperature water, or 4 teaspoons per quart if you’re mixing a smaller batch. The solution stays effective for up to 24 hours once mixed, then loses potency, so don’t stockpile it in a spray bottle for later use.
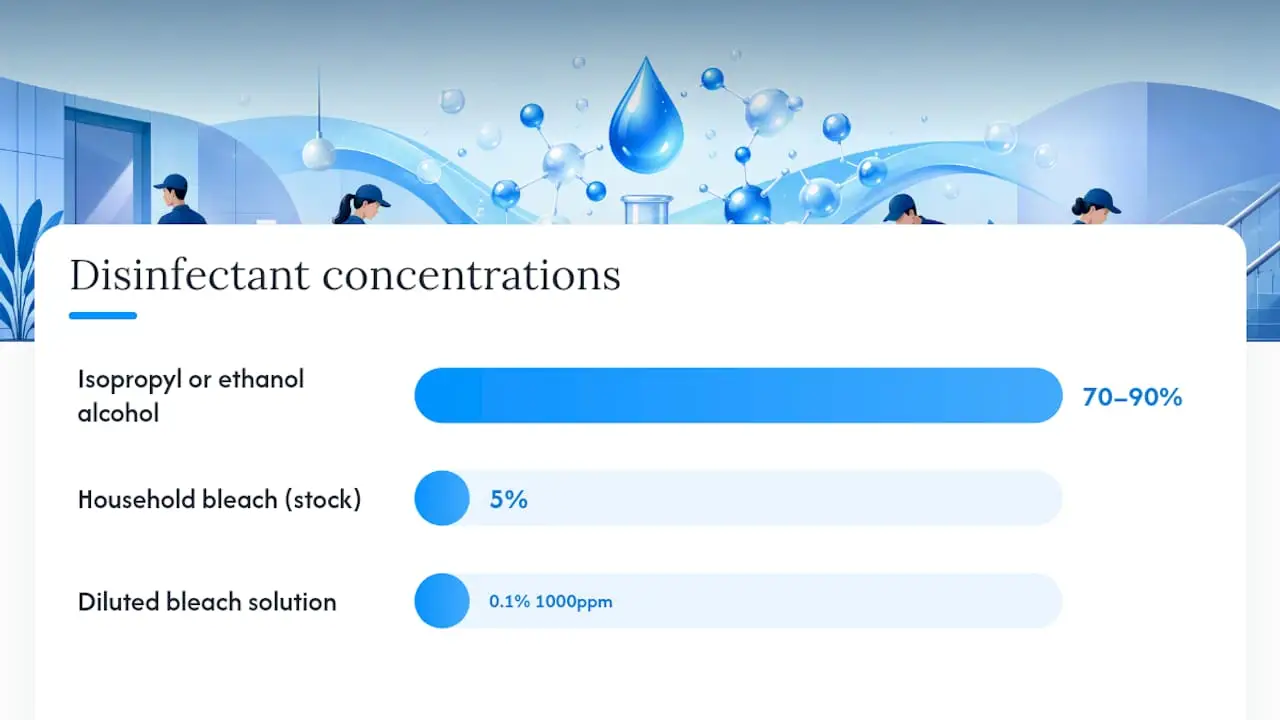
For alcohol-based disinfecting, aim for 70% to 90% isopropyl or ethanol alcohol. Lower concentrations don’t penetrate cell walls as effectively, and higher concentrations can evaporate too fast to maintain contact time, which is part of why 70% shows up so consistently across public health guidance rather than 99%.
Before you use any product, run through this label checklist:
- Confirm the EPA registration number is present.
- Check the expiration date; disinfectants lose potency over time.
- Note the required contact time for your target pathogen.
- Verify surface compatibility, some disinfectants damage certain finishes.
- Follow ventilation and PPE instructions printed on the label.
| Product category | Typical use case | Concentration or notes | Contact time reminder |
|---|---|---|---|
| EPA-registered spray or wipe | Countertops, doorknobs, bathroom fixtures | Follow label ratio exactly | Usually 1 to 10 minutes; check label |
| Diluted bleach solution | Hard, non-porous surfaces; kitchens, bathrooms | About 1,000 ppm (1/3 cup bleach per gallon of water) | Keep visibly wet several minutes; discard after 24 hours |
| Isopropyl or ethanol alcohol | Phone screens, remotes, small electronics | 70% to 90% concentration | 30 seconds to a few minutes; allow to air-dry |
| Soap or all-purpose detergent | Pre-cleaning step before disinfecting | Standard dilution per product | Not a disinfectant; removes soil only |
Cleaning Electronics, Fabrics, and Delicate Finishes Without Ruining Them
Spraying a keyboard directly is one of the fastest ways to short-circuit it. Apply alcohol to a lint-free cloth first, then wipe the device, rather than spraying liquid onto the screen or into the gaps between keys. A 70% isopropyl alcohol wipe works well on phones, tablets, and remote controls when the manufacturer hasn’t published its own guidance. Wipeable screen covers reduce how often you need to disinfect the device itself, since you’re cleaning a cheap accessory instead of a $900 phone.
Soft and porous surfaces need a different approach entirely. Remove visible contamination first, then launder linens, towels, and cushion covers at the warmest water setting the fabric allows. Bleach and alcohol don’t disinfect porous materials the way they do hard surfaces; heat from a washer and dryer cycle does most of the real work there. For items you can’t launder, look for EPA-approved products specifically labeled for soft surfaces or porous materials.
Delicate finishes deserve a test patch before you commit. Finished wood, painted trim, and some countertop materials can discolor or degrade under strong bleach or abrasive scrubbing. Dab your cleaner on a hidden corner, wait a few minutes, and check for any change before treating the whole surface.
Pro Tip: Shared cushions and stuffed toys that can’t go in the wash are a genuine gap in most cleaning routines. If they can’t be laundered or wiped down with a fabric-safe disinfectant, the safest move is rotating them out of high-traffic use during illness in the household, rather than trying to disinfect something that will just reabsorb whatever you spray on it.
How Often Should You Actually Be Cleaning These Surfaces?
Daily wiping covers most high-touch surfaces in a typical home or office. High-traffic public areas, entrances, shared bathrooms, elevator buttons, warrant twice-daily attention or more depending on foot traffic. The moment someone in the household or building is sick, or someone immunocompromised is present, bump everything up in frequency without waiting for a symptom to get worse.
Public health guidance generally recommends daily cleaning for frequently touched points and weekly cleaning for lower-use surfaces, with an increase during flu season or after a household illness. That’s a reasonable baseline for most homes.
| Setting | Typical frequency | When to increase |
|---|---|---|
| Home, high-touch points | Daily | Illness in household, visitors, flu season |
| Home, low-use surfaces | Weekly | After hosting guests or a deep clean cycle |
| Office, shared equipment | Daily | Cold and flu season, after visible use spikes |
| Public high-traffic areas | Twice daily or more | Outbreak conditions, heavy foot traffic events |
Post-illness cleaning deserves its own short protocol, separate from your regular routine. Once someone recovers, disinfect every hard high-touch surface in the home and launder linens, towels, and pajamas in hot water. Bathrooms get a full disinfecting pass, not just a wipe. If possible, keep a separate set of cleaning supplies for the sick room until everyone’s healthy, so you’re not dragging contaminated rags through the rest of the house.
Phones and remotes deserve specific attention after a cold or flu. They’re consistently among the germiest objects in a household because nobody thinks to clean them the way they clean a bathroom.
Keeping Yourself Safe While You Disinfect
1. Wear gloves when the product label calls for them. Most bleach and strong disinfectant labels recommend gloves; general soap and water cleaning usually doesn’t require them.
2. Remove gloves correctly. Peel from the wrist, turning the glove inside out as you pull, and avoid touching the outer surface with bare skin. Dispose of them in a lined trash bin, not on a counter you’re about to reuse.
3. Ventilate the room. Open a window or run an exhaust fan any time you’re using bleach or a strong chemical disinfectant. Fumes concentrate fast in small bathrooms.
4. Never mix chemicals. Bleach and ammonia, bleach and vinegar, or bleach and other acidic cleaners all produce dangerous gas. Facility safety guidance treats chemical labeling and hazard communication as a baseline requirement precisely because mixing accidents happen so often in ordinary households and workplaces.
5. Store products in their original containers. Never transfer bleach or disinfectant into an unlabeled spray bottle; someone else in the house may not know what’s inside it.
6. Check expiration dates. Disinfectants degrade. An expired product may not deliver its labeled kill claim even with a full contact time.
7. Dispose of wipes and containers per label instructions and local waste rules. Some disinfectant wipes and empty chemical containers have specific disposal guidance you shouldn’t ignore.
Do UV Lights and Fogging Machines Actually Help?
Automated disinfection technology gets a lot of marketing attention, and some of it earns the hype, within limits. UV-C light, vaporized hydrogen peroxide, and steam systems can meaningfully reduce bioburden in a room. Reviews of these technologies show real reductions in pathogens like MRSA, VRE, and C. difficile under controlled conditions.
Automated methods are adjuncts to manual cleaning, not replacements for it. UV light only disinfects what it can directly reach, and any surface shadowed by furniture or clutter goes untreated no matter how long the cycle runs.
That line-of-sight limitation is the practical catch. A UV-C device can’t disinfect the underside of a doorknob or the inside of a drawer. Hydrogen peroxide vapor systems work more thoroughly but require sealing the room, trained operators, and enough downtime that they make sense mainly for:
- Terminal cleaning after a serious outbreak in a healthcare-adjacent setting.
- Facilities with a documented infection control need beyond routine household hygiene.
- Situations where a room needs to be taken fully offline for a treatment cycle anyway.
For a typical home or small office, manual cleaning and disinfecting following the sequence above remains the most cost-effective, reliable option. Public health authorities consistently treat manual cleaning as the frontline strategy for exactly this reason; the technology is impressive, but it solves a narrower problem than most households actually have.
Your One-Page High-Touch Cleaning Checklist
Keep this near your cleaning supplies, or copy it into a shared doc if you’re managing a facility.
Supplies to keep stocked:
- Disposable gloves
- Microfiber cloths (at least two, kept separate for cleaning versus disinfecting)
- Soap or all-purpose cleaner
- An EPA-registered disinfectant or prepared bleach solution
- 70% alcohol wipes for electronics
- Trash bags for disposable items
Daily high-touch targets:
- [ ] Doorknobs and light switches
- [ ] Faucet handles and toilet handles
- [ ] Remote controls, phones, keyboards
- [ ] Kitchen counters and refrigerator handle
Weekly targets:
- [ ] Cabinet pulls, drawer handles
- [ ] Table edges and shared work surfaces
- [ ] Appliance buttons
Post-illness targets:
- [ ] Full disinfecting pass on every daily target above
- [ ] Launder linens, towels, and pajamas in hot water
- [ ] Disinfect bathroom fixtures thoroughly
- [ ] Set aside dedicated cleaning supplies for the sick room until recovery
Store this list somewhere visible, on the inside of a supply closet door or pinned near the kitchen, so it becomes a routine instead of a once-in-a-while scramble.
When Does It Make More Sense to Hire a Professional?
Most households can handle high-touch surface cleaning with the protocol above and fifteen minutes a day. But there’s a point where doing it yourself stops being the efficient choice, and recognizing that point matters as much as knowing the steps.
If you’re managing a larger home, dealing with recurring illness that keeps cycling through the household, or coordinating a post-illness deep clean across multiple rooms and bathrooms, a professional service closes the gap between what you know you should do and what you actually have time to do consistently. Facility managers juggling multiple properties or high-traffic common areas face the same math on a bigger scale.
Run through this before deciding:
- Scale of work. A studio apartment and a five-bedroom house with three bathrooms are not the same job, even with identical protocols.
- Special-surface needs. Homes with a lot of electronics, upholstered furniture, or delicate finishes benefit from someone trained to handle those materials without damaging them.
- Frequency demands. If illness keeps recurring in your household, a recurring professional deep clean schedule beats trying to remember to do it yourself every time.
- Safety concerns. Industrial-grade equipment, electrostatic sprayers, or any adjunct method beyond basic manual cleaning generally calls for someone trained to use it correctly.
None of this replaces daily habits. But when the volume of surfaces outpaces the time you actually have, hiring help isn’t a failure of discipline. It’s a reasonable trade of money for time and consistency, the same trade you make with lawn care or HVAC maintenance.
What to Expect From a Professional High-Touch Cleaning Service
Purehomescleaning gives you back the fifteen minutes a day you’d otherwise spend chasing doorknobs and remote controls, with a trained team following the same clean-then-disinfect sequence outlined above, done consistently, on a schedule you set instead of one you have to remember.
Purehomescleaning builds routine and deep cleaning plans around eco-friendly products, with the flexibility to request a targeted high-touch surface pass as part of any visit, whether that’s a recurring weekly clean or a one-time deep clean after someone in the house has been sick. If you’re evaluating any provider for this kind of work, ask about their use of EPA-registered products, whether they follow a written protocol for high-touch areas specifically, and whether they carry insurance and offer a satisfaction guarantee. Scheduling flexibility matters too; a provider that only offers rigid monthly slots doesn’t help much when you need a post-illness clean this week, not next month.
You can see the full range of cleaning services offered, including move-in and move-out cleaning for anyone setting up a new space where surface history is unknown. Ready to hand off the high-touch surfaces to someone trained to handle them properly? Book a cleaning online and note any specific high-touch areas you want prioritized during booking.
Sources
- When and how to clean and disinfect your home (CDC)
- COVID-19: Cleaning and disinfecting surfaces in non-health care settings (WHO)
- Selected EPA-registered disinfectants